byteWIKI

About the company

bytes at work is a modern Swiss Technology company specialized in industrial computing. Our focus lies on the development of hardware and embedded software, as well as customizing Linux systems. The entire development life cycle takes place in-house with transparent project management and customer involvement. This significantly reduces both development time and development costs.
We have years of experience in developing coordinated hardware and software solutions – from the prototype to the final product. We make your system usable end-to-end for your needs.
Our philosophy
Hardware and software for industrial computers have to fulfill an immense range of demanding challenges. They are used in completely different areas of industries and they have to be able to adapt unique and specific tasks. Our employees pay particular attention to each and every customer. That is why our products and services meet and even exceed our customers expectations.
We from bytes at work are aware that the current persistent industrial development also has its darker side. This is our motivation to be exemplary in terms of use of resources. No wonder that unconditional reliability, long service life and low power consumption are main features of all our products.
Unboxing byteDEVKIT STM32MP1
This guide delivers new users a brief overview of the package content and the functions of our byteDEVKIT STM32MP1. When unboxing you should find the following components:
- The byteDEVKIT STM32MP1 with a 5-inch touchscreen display
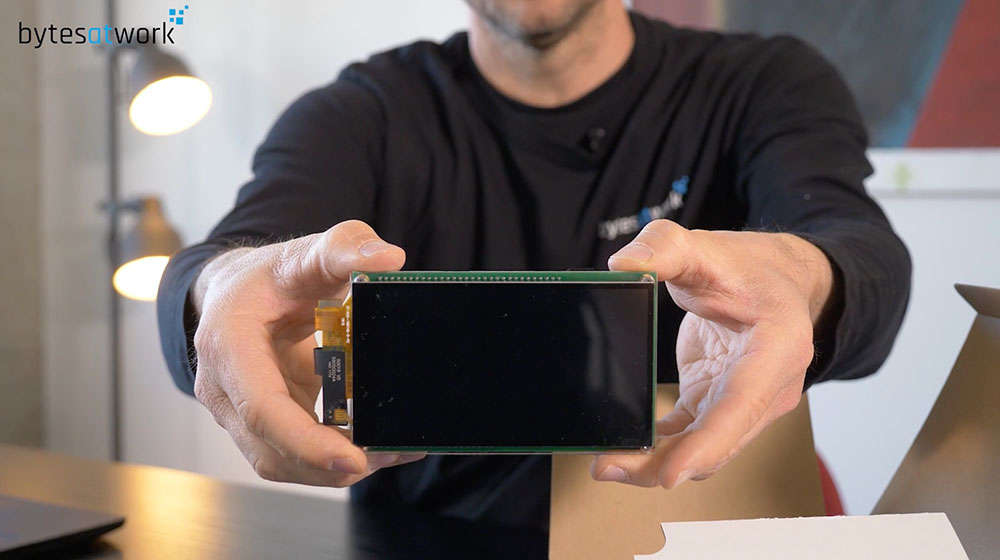
- The SOM STM32MP1x
Note
The SOM STM32MP1x is already connected with the byteDEVKIT STM32MP1.

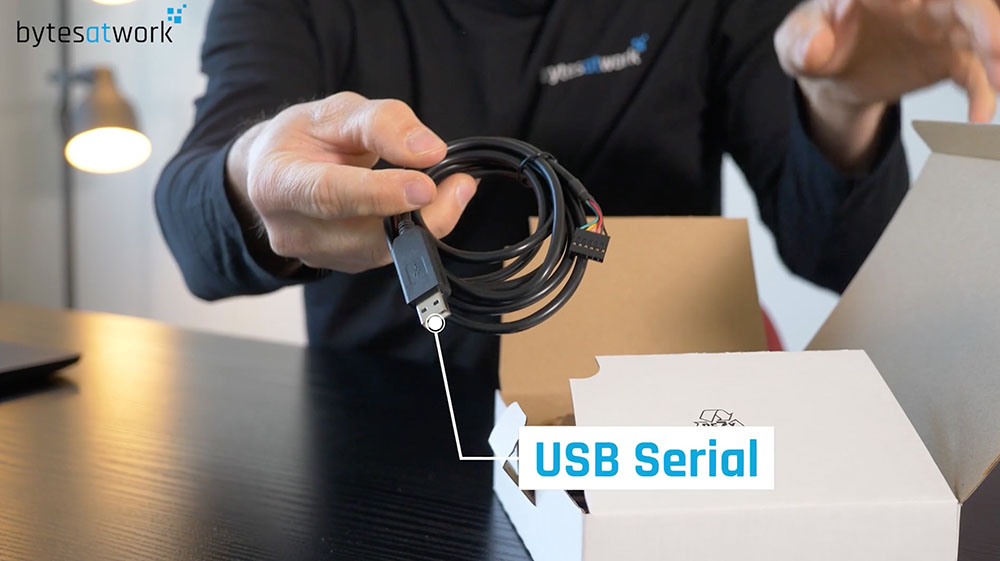
- The power supply for the byteDEVKIT STM32MP1

- The USB serial cable for the byteDEVKIT STM32MP1
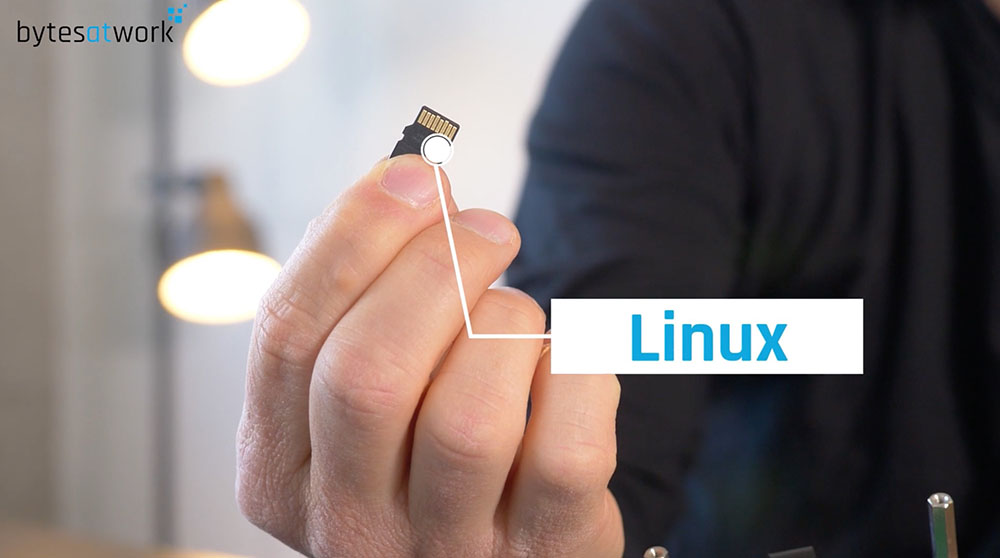
- micro-SD card with preinstalled Linux
Technical overview byteDEVKIT STM32MP1
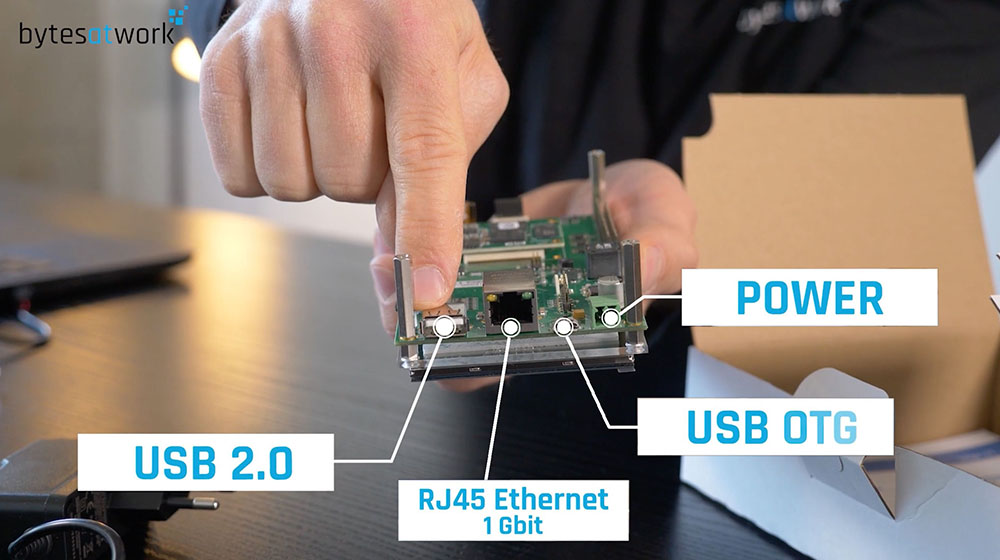
- The byteDEVKIT STM32MP1 offers the following connectors on the front side:
- USB 2.0
- RJ45 Ethernet 1 Gbit
- USB OTG
- Power connector
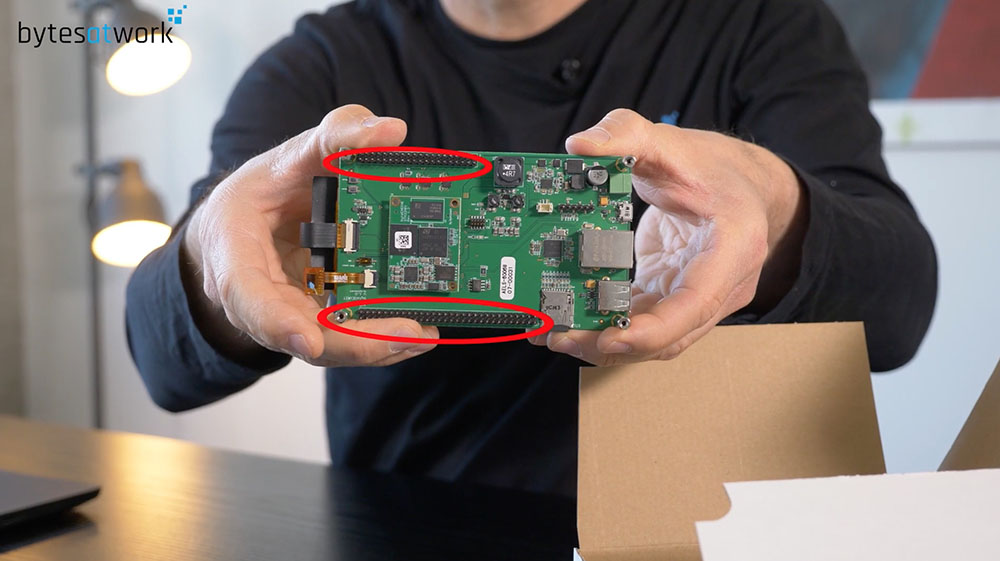
- You find the extension on the backside. The byteDEVKIT STM32MP1 offers:
- 40 pin header compatible for the rasperry pi
- 60 pin header with all the needed signals: I2C, SPI, CAN, UART, I2S, LDC, GPIO and PWM
- The micro-SD card slot contains a micro-SD card with preinstalled Linux OS:
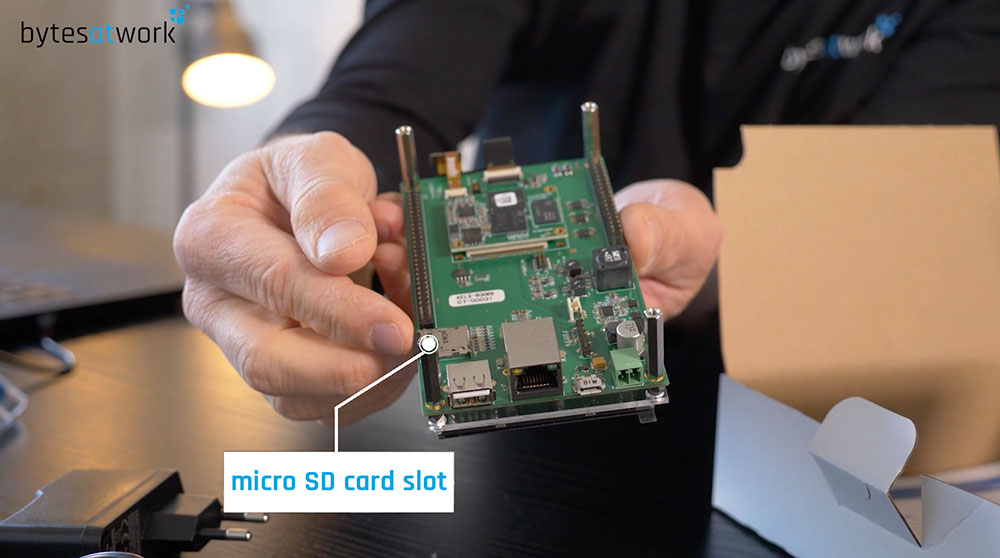
Note
The micro-SD card is already slotted to the byteDEVKIT STM32MP1.

Unboxing Video Tutorial
First start byteDEVKIT STM32MP1
This guide helps with the first start of the byteDEVKIT STM32MP1:
Connecting the Hardware and first Booting
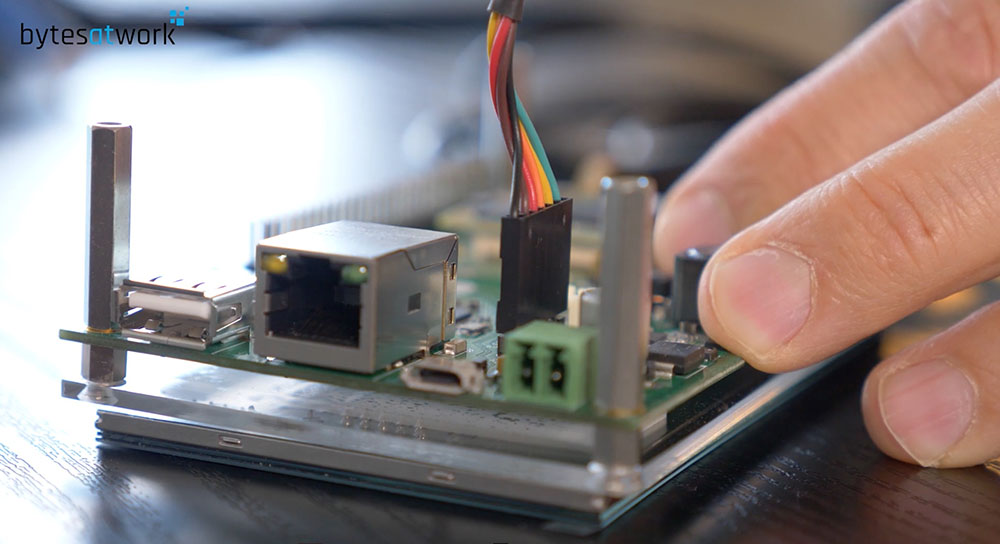
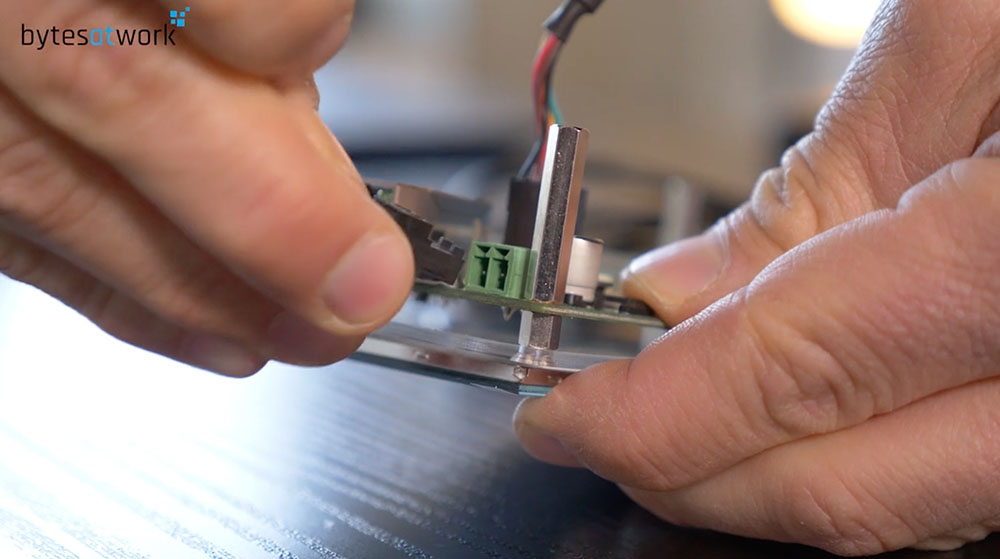
- Prepare the USB serial cable for connection
- Locate the black cable of the serial connector.

Caution
Connect the serial cable to the byteDEVKIT STM32MP1 as shown. The black cable must point towards the USB OTG connector.
- Connect the USB connector with USB port of your computer or laptop.
- Connect the ethernet RJ45 with the byteDEVKIT STM32MP1.

- Plug in the power socket.
- Connect the power supply cable to the power slot of the byteDEVKIT STM32MP1.
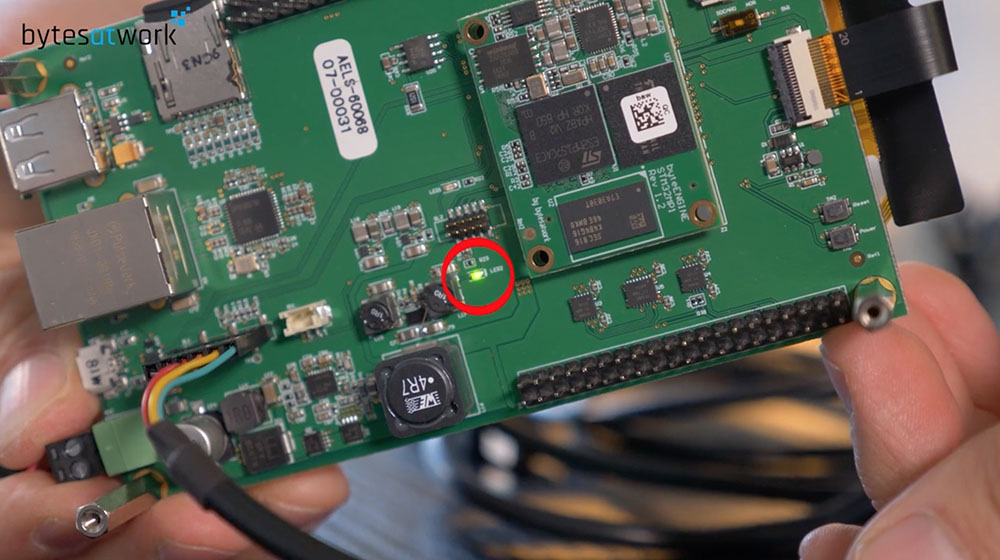
- A green LED on the backside of the byteDEVKIT STM32MP1 indicates the status of the power supply.
Attention
Your byteDEVKIT STM32MP1 is powered up, when the green LED lights up. If the LED doesn´t light up, check the connection of the power socket.
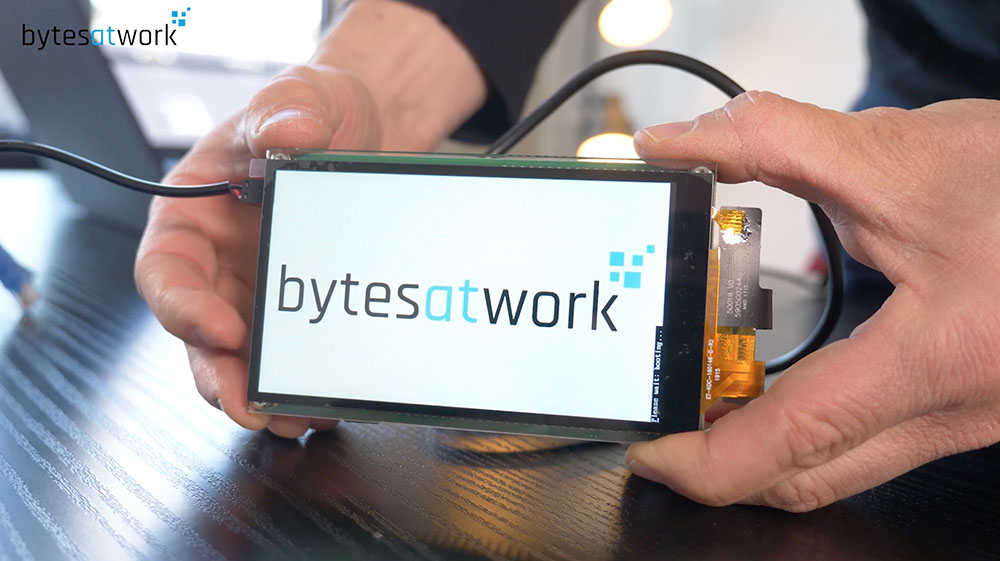
- The 5-inch touchscreen display shows the bytes at work-logo when booting.
Hint
The booting procedure will take a few seconds.
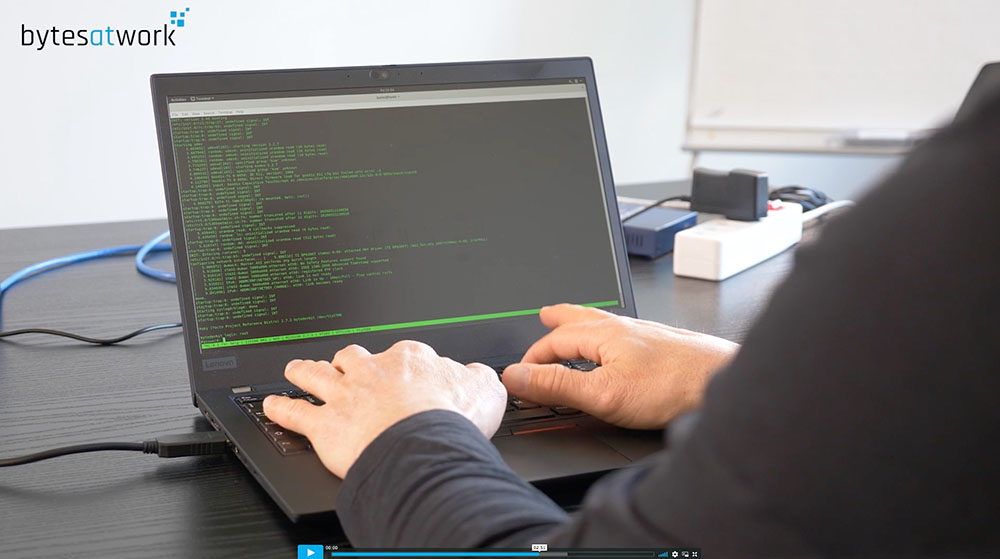
- Now you can access the byteDEVKIT STM32MP1 with your laptop.
Hint
For further information refer to: “Bring-up_byteDEVKIT_STM32MP1”.
Bring-up byteDEVKIT STM32MP1
How do I connect to byteDEVKIT using the serial console?
- Use the serial port to connect the byteDEVKIT STM32MP1:
- Connect the debug cable with the byteDEVKIT STM32MP1 and your computer/laptop
- Start a serial communication program on your computer/laptop (‹putty›, ‹minicom› or something else)
- Set to 115200, 8N1, no flow control
- login with: user: “root” and password: “rootme”
LINUX
- Start PuTTY
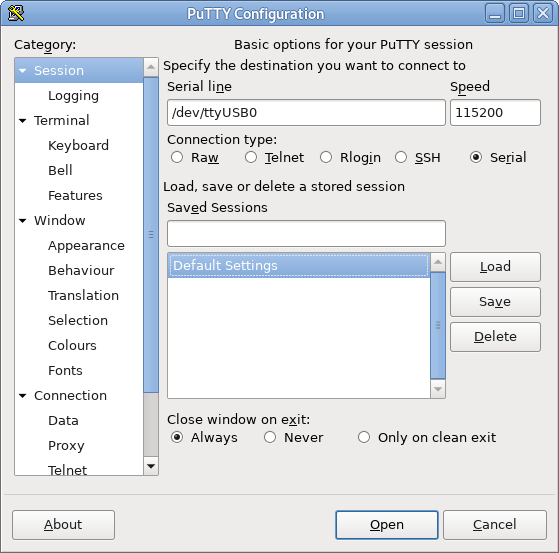
- Click “Serial”
- Change “Serial line” to “/dev/ttyUSB0”
- Change “Speed” to 115200
- Navigate to “Serial” in the menu “Connection”
Hint
make sure you have Data bits set to 8, Stop bits set to 1, Parity to None, Flow control to None
- Click “Open”
- Power up the byteDEVKIT STM32MP1
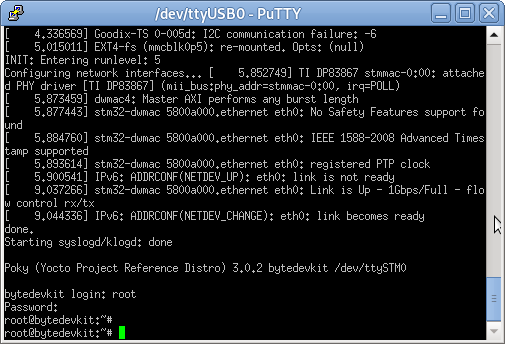
- Once the login prompt appears, login with user “root” and password “rootme”

Note
You are now succesfully connected to the byteDEVKIT STM32MP1
WINDOWS
- Connect the USB serial adapter to the computer
- Windows installs the driver automatically (if the windows doesn´t install the driver reconnect the serial adapter cable)
- Open device manager and navigate to “Ports (COM & LPT)”
- The serial adapter shows up in the device tree: “Prolific USB-to-Serial Comm Port (COM7)”
- “COM7” is your serial port
- Install a serial terminal application, e.g. PuTTY (version 0.59 and newer) https://www.chiark.greenend.org.uk/~sgtatham/putty/latest.html
- Start PuTTY

- Click “Serial”
- Change “Serial line” to serial port you found in device manager
- Change “Speed” to 115200
- Navigate to “Serial” in the menu “Connection”
Hint
make sure you have Data bits set to 8, Stop bits set to 1, Parity to None, Flow control to None
- Click “Open”
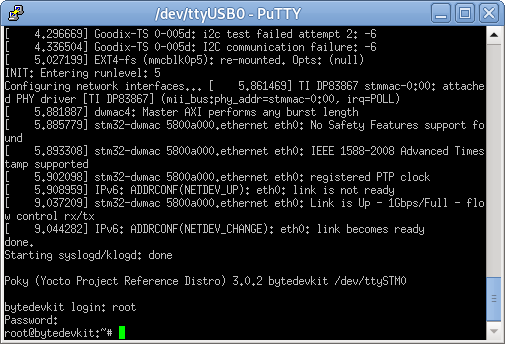
Power up the byteDEVKIT STM32MP1

Once the login prompt appears, login with user “root” and password “rootme”
Note
You are now succesfully connected to the byteDEVKIT STM32MP1
How to install additional software using apt
Hint
Follow the link for additional information about “apt”: https://help.ubuntu.com/community/AptGet/Howto
- Connect the embedded device’s ethernet to your LAN
- Run: apt-get update
- Run: apt-cache search <software component> to search for available packages e.g.: apt-cache search nodejs
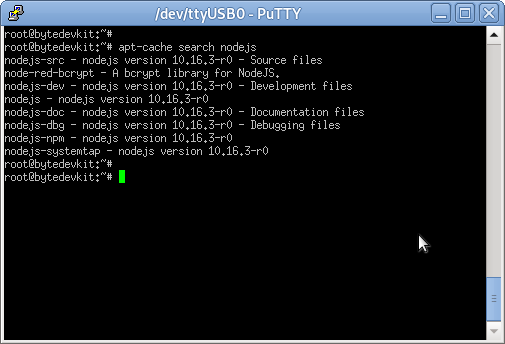
- Run: apt-get install <software component> to install additional software e.g.: apt-get install nodejs

Software Development
The entire development life cycle is done in-house with transparent project management and customer involvement. We have proven experience in a wide range of industries, including industrial automation and custom solutions for consumer electronics. This section helps you step by step initiating the software development process:
Image
Where do you get the SD card image?
| Device | Yocto Version | Download | Checksum |
|---|---|---|---|
| byteDEVKIT | Yocto 3.0 | bytesatwork-minimal-image-bytedevkit.wic.gz (wic.bmap) | 4ce5b056a78a0bfecae46ad6777a8b7bcfa0e5a679d4f53654969234c9a19282 |
| byteDEVKIT | Yocto 2.7 | flashlayout_bytesatwork-minimal-image_FlashLayout_sdcard_stm32mp157c-bytedevkit.raw.gz | 7e62644473c21d200603b52d0080894a0ccfd950dd4a2f3c7df2b14753566de8 |
| bytePANEL | Yocto 3.0 | bytesatwork-minimal-image-bytepanel-emmc.wic.gz (wic.bmap) | e3e166f28fb815b09c6372bbcae4b4c8fcd00f93e57e96084bdee90c255764d9 |
| bytePANEL | Yocto 2.7 | devbase-image-bytesatwork-bytepanel-emmc-20190729194430.sdimg.gz | 3b3e51d83c68f68d6ebbc2983d6b41b9e21d4878c1c9570804e6949624d7a41e |
How do you flash the image?
Attention
- You need a microSD card with at least 8GB capacity.
- All existing data on the microSD card will be lost.
- Do not format the microSD card before flashing.
byteDEVKIT
Yocto 3.0
Windows
- Unzip the file
bytesatwork-minimal-image-bytedevkit.wic.gz(e.g. with 7-zip) - Write the resulting file to the microSD card with a tool like Roadkils Disk Image
Linux
gunzip -c bytesatwork-minimal-image-bytedevkit.wic.gz | dd of=/dev/mmcblk<X> bs=8M conv=fdatasync status=progress
- Unzip the file
Hint
To improve write performance, you could use bmap-tools under Linux:
bmaptool copy bytesatwork-minimal-image-bytedevkit.wic.gz /dev/mmcblk<X>
Yocto 2.7
Windows
- Unzip the file
flashlayout_bytesatwork-minimal-image_FlashLayout_sdcard_stm32mp157c-bytedevkit.raw.gz(e.g. with 7-zip) - Write the resulting file to the microSD card with a tool like Roadkils Disk Image
Linux
gunzip -c flashlayout_bytesatwork-minimal-image_FlashLayout_sdcard_stm32mp157c-bytedevkit.raw.gz | dd of=/dev/mmcblk<X> bs=8M conv=fdatasync status=progress
- Unzip the file
bytePANEL
Yocto 3.0
Windows
- Unzip the file
bytesatwork-minimal-image-bytepanel-emmc.wic.gz(e.g. with 7-zip) - Write the resulting file to the microSD card with a tool like Roadkils Disk Image
Linux
gunzip -c bytesatwork-minimal-image-bytepanel-emmc.wic.gz | dd of=/dev/mmcblk<X> bs=8M conv=fdatasync status=progress
- Unzip the file
Hint
To improve write performance, you could use bmap-tools under Linux:
bmaptool copy bytesatwork-minimal-image-bytepanel-emmc.wic.gz /dev/mmcblk<X>
Yocto 2.7
Windows
- Unzip the file
devbase-image-bytesatwork-bytepanel-emmc-20190729194430.sdimg.gz(e.g. with 7-zip) - Write the resulting file to the microSD card with a tool like Roadkils Disk Image
Linux
gunzip -c devbase-image-bytesatwork-bytepanel-emmc-20190729194430.sdimg.gz | dd of=/dev/mmcblk<X> bs=8M conv=fdatasync status=progress
- Unzip the file
How do you build an image?
byteDEVKIT
Yocto 3.0
Use
repoto download all necessary repositories:$ mkdir -p ~/workdir/bytedevkit/3.0; cd ~/workdir/bytedevkit/3.0 $ repo init -u https://github.com/bytesatwork/bsp-platform-st.git -b zeus $ repo sync
If those commands are completed successfully, the following command will set up a Yocto Project environment for byteDEVKIT:
$ cd ~/workdir/bytedevkit/3.0 $ MACHINE=bytedevkit DISTRO=poky-bytesatwork EULA=1 . setup-environment build
The final command builds the development image:
$ cd $BUILDDIR $ bitbake bytesatwork-minimal-image
The output is found in:
~/workdir/bytedevkit/3.0/build/tmp/deploy/images/bytedevkit
Hint
For additional information about yocto images and how to build them, please visit: https://www.yoctoproject.org/docs/3.0/mega-manual/mega-manual.html#brief-building-your-image
Yocto 2.7
Use
repoto download all necessary repositories:$ mkdir -p ~/workdir/bytedevkit/2.7; cd ~/workdir/bytedevkit/2.7 $ repo init -u https://github.com/bytesatwork/bsp-platform-st.git -b warrior $ repo sync
If those commands are completed successfully, the following command will set up a Yocto Project environment for byteDEVKIT:
$ cd ~/workdir/bytedevkit/2.7 $ MACHINE=bytedevkit DISTRO=poky-bytesatwork EULA=1 . setup-environment build
The final command builds the development image:
$ cd $BUILDDIR $ bitbake devbase-image-bytesatwork
The output is found in:
~/workdir/bytedevkit/2.7/build/tmp/deploy/images/bytedevkit
bytePANEL
Yocto 3.0
Use
repoto download all necessary repositories:$ mkdir -p ~/workdir/bytepanel/3.0; cd ~/workdir/bytepanel/3.0 $ repo init -u https://github.com/bytesatwork/bsp-platform-ti.git -b zeus $ repo sync
If those commands are completed successfully, the following command will set up a Yocto Project environment for bytePANEL:
$ cd ~/workdir/bytepanel/3.0 $ MACHINE=bytepanel DISTRO=poky-bytesatwork EULA=1 . setup-environment build
The final command builds the development image:
$ cd $BUILDDIR $ bitbake bytesatwork-minimal-image
The output is found in:
~/workdir/bytepanel/3.0/build/tmp/deploy/images/bytepanel
Hint
For additional information about yocto images and how to build them, please visit: https://www.yoctoproject.org/docs/3.0/mega-manual/mega-manual.html#brief-building-your-image
Yocto 2.7
Use
repoto download all necessary repositories:$ mkdir -p ~/workdir/bytepanel/2.7; cd ~/workdir/bytepanel/2.7 $ repo init -u https://github.com/bytesatwork/bsp-platform.git -b warrior $ repo sync
If those commands are completed successfully, the following command will set up a Yocto Project environment for bytePANEL:
$ cd ~/workdir/bytepanel/2.7 $ MACHINE=bytepanel DISTRO=poky-bytesatwork EULA=1 . setup-environment build
The final command builds the development image:
$ cd $BUILDDIR $ bitbake devbase-image-bytesatwork
The output is found in:
~/workdir/bytepanel/2.7/build/tmp/deploy/images/bytepanel
How to modify the image
The image recipes can be found in
~/workdir/<machine name>/<yocto version>/sources/meta-bytesatwork/recipes-core/imagesThis is relative to where you started the
repocommand to fetch all the sources.Edit the minimal-image recipe
bytesatwork-minimal-image.bbAdd the desired software-package to
IMAGE_INSTALLvariable, for example addnet-toolstobytesatwork-minimal-image.bbRebuild the image by:
$ cd ~/workdir/<machine name>/<yocto version> $ MACHINE=<machine name> DISTRO=poky-bytesatwork EULA=1 . setup-environment build $ bitbake bytesatwork-minimal-image
How to rename the image
If you want to rename or copy an image, simply rename or copy the image recipe by:
$ cd ~/workdir/<machine name>/<yocto version>/build/tmp/deploy/images/<machine name> $ cp bytesatwork-minimal-image.bb customer-example-image.bb
Troubleshooting
Image size is to small
If you encounter that your image size is to small to install additional software, please have a look at the
IMAGE_ROOTFS_SIZEvariable under~/workdir/<machine-name>/<yocto version>/sources/meta-bytesatwork/recipes-core/images/bytesatwork-minimal-image.bb. Increase the size if necessary.
Toolchain
Where do you get the toolchain?
| Device | Yocto Version | Download | Checksum |
|---|---|---|---|
| byteDEVKIT | Yocto 3.0 | poky-bytesatwork-glibc-x86_64-bytesatwork-minimal-image-cortexa7t2hf-neon-vfpv4-bytedevkit-toolchain-3.0.2.sh | 50ac1ed18dcbbf8ff37854f6752af52e1e01aed1a26815f41b3d9b965dcb5806 |
| byteDEVKIT | Yocto 2.7 | poky-bytesatwork-glibc-x86_64-devbase-image-bytesatwork-cortexa7t2hf-neon-vfpv4-bytedevkit-toolchain-2.7.1.sh | 61896873ac7c75ac711a0b8e439ded6721d1a794deec26b4903178efbf51d307 |
| bytePANEL | Yocto 3.0 | poky-bytesatwork-glibc-x86_64-bytesatwork-minimal-image-armv7at2hf-neon-bytepanel-emmc-toolchain-3.0.2.sh | a90763d7ff408e9e5f0556b051eccd3ea85c43406099c9a61d98a32e6a04e078 |
| bytePANEL | Yocto 2.7 | poky-bytesatwork-glibc-x86_64-devbase-image-bytesatwork-armv7at2hf-neon-bytepanel-toolchain-2.7.3.sh | b25e4a3f764eaf583ad0e6a3e0edcac9a1a9314ab6d1f4aad290c415afdbe0e7 |
How do you install the toolchain?
Simply download the toolchain and execute the downloaded file, which is a self-extracting shell script.
Hint
If you encounter problems when trying to install the toolchain, make sure the downloaded toolchain is executable. Run chmod +x /<path>/<toolchain-file>.sh to make it executable.
Important
- The following tools need to be installed on your development system:
xz(Debian package:xz-utils)python(any version)gcc
How do you use the toolchain?
byteENGINE STM32MP1x
Source the installed toolchain:
source /opt/poky-bytesatwork/3.0.2/environment-setup-cortexa7t2hf-neon-vfpv4-poky-linux-gnueabi
Check if Cross-compiler is available in environment:
echo $CC
You should see the following output:
arm-poky-linux-gnueabi-gcc -mthumb -mfpu=neon-vfpv4 -mfloat-abi=hard -mcpu=cortex-a7 -fstack-protector-strong -D_FORTIFY_SOURCE=2 -Wformat -Wformat-security -Werror=format-security --sysroot=/opt/poky-bytesatwork/3.0.2/sysroots/cortexa7t2hf-neon-vfpv4-poky-linux-gnueabi
Crosscompile the source code, e.g. by:
$CC helloworld.c -o helloworld
Check generated binary:
file helloworld
The output that is shown in prompt afterwards:
helloworld: ELF 32-bit LSB pie executable, ARM, EABI5 version 1
byteENGINE AM335x
Source the installed toolchain:
source /opt/poky-bytesatwork/3.0.2/environment-setup-armv7at2hf-neon-poky-linux-gnueabi
Check if Cross-compiler is available in environment:
echo $CC
You should see the following output:
arm-poky-linux-gnueabi-gcc -march=armv7-a -mthumb -mfpu=neon -mfloat-abi=hard --sysroot=/opt/poky-bytesatwork/3.0.2/sysroots/armv7at2hf-neon-poky-linux-gnueabi
Cross-compile the source code, e.g. by:
$CC helloworld.c -o helloworld
Check generated binary:
file helloworld
The output that is shown in prompt afterwards:
helloworld: ELF 32-bit LSB pie executable, ARM, EABI5 version 1
How to bring your binary to the target?
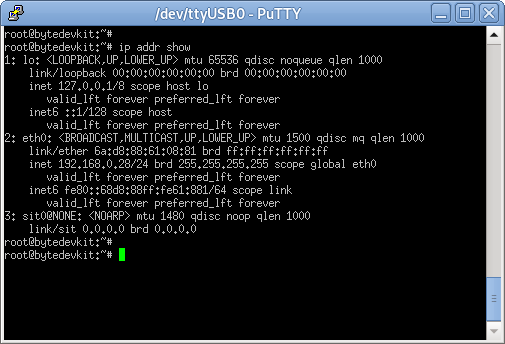
- Connect the embedded device’s ethernet to your LAN
- Determine the embedded target IP address by
ip addr show
- Copy your binary, e.g.
helloworldto the target byscp helloworld root@<ip address of target>:/tmp

- Run
chmod +xon the target to make your binary executable:chmod +x /<path>/<binary name> - Run your binary on the target:
/<path>/<binary name>
How do you build a toolchain?
byteDEVKIT
Yocto 3.0
$ cd ~/workdir/bytedevkit/3.0 $ repo init -u https://github.com/bytesatwork/bsp-platform-st.git -b zeus $ repo sync
If those commands are completed successfully, the following command will set up a Yocto Project environment for byteDEVKIT:
$ cd ~/workdir/bytedevkit/3.0 $ MACHINE=bytedevkit DISTRO=poky-bytesatwork EULA=1 . setup-environment build
The final command builds an installable toolchain:
$ cd $BUILDDIR $ bitbake bytesatwork-minimal-image -c populate_sdk
The toolchain is located under:
~/workdir/bytedevkit/3.0/build/tmp/deploy/sdk
Yocto 2.7
$ cd ~/workdir/bytedevkit/2.7 $ repo init -u https://github.com/bytesatwork/bsp-platform-st.git -b warrior $ repo sync
If those commands are completed successfully, the following command will set up a Yocto Project environment for byteDEVKIT:
$ ~/workdir/bytedevkit/2.7 $ MACHINE=bytedevkit DISTRO=poky-bytesatwork EULA=1 . setup-environment build
The final command builds an installable toolchain:
$ cd $BUILDDIR $ bitbake devbase-image-bytesatwork -c populate_sdk
The toolchain is located under:
~/workdir/bytedevkit/2.7/build/tmp/deploy/sdk
bytePANEL
Yocto 3.0
$ cd ~/workdir/bytepanel/3.0 $ repo init -u https://github.com/bytesatwork/bsp-platform-ti.git -b zeus $ repo sync
If those commands are completed successfully, the following command will set up a Yocto Project environment for bytePANEL:
$ cd ~/workdir/bytepanel/3.0 $ MACHINE=bytepanel DISTRO=poky-bytesatwork EULA=1 . setup-environment build
The final command builds an installable toolchain:
$ cd $BUILDDIR $ bitbake bytesatwork-minimal-image -c populate_sdk
The toolchain is located under:
~/workdir/bytepanel/3.0/build/tmp/deploy/sdk
Yocto 2.7
$ cd ~/workdir/bytepanel/2.7 $ repo init -u https://github.com/bytesatwork/bsp-platform.git -b warrior $ repo sync
If those commands are completed successfully, the following command will set up a Yocto Project environment for bytePANEL:
$ cd ~/workdir/bytepanel/2.7 $ MACHINE=bytepanel DISTRO=poky-bytesatwork EULA=1 . setup-environment build
The final command builds an installable toolchain:
$ cd $BUILDDIR $ bitbake devbase-image-bytesatwork -c populate_sdk
The toolchain is located under:
~/workdir/bytepanel/2.7/build/tmp/deploy/sdk
How to modify your toolchain
Currently the bytesatwork toolchain is generated out of the bytesatwork-minimal-image recipe. If you want to add additional libraries and development headers to customize the toolchain, you need to modify the bytesatwork-minimal-image recipe. It can be found under ~/workdir/<machine name>/<yocto version>/sources/meta-bytesatwork/recipes-core/images
For example if you want to develop your own ftp client and you need libftp and the corresponding header files, edit the recipe bytesatwork-minimal-image.bb and add ftplib to the IMAGE_INSTALL variable.
This will provide the ftplib libraries and development headers in the toolchain. After adding additional software components, the toolchain needs to be rebuilt by:
$ cd ~/workdir/<machine name>/<yocto version>
$ MACHINE=<machine> DISTRO=poky-bytesatwork EULA=1 . setup-environment build
$ bitbake bytesatwork-minimal-image -c populate_sdk
The newely generated toolchain will be available under:
~/workdir/<machine name>/<yocto version>/build/tmp/deploy/sdk
For additional information, please visit: https://www.yoctoproject.org/docs/3.0.2/overview-manual/overview-manual.html#cross-development-toolchain-generation
Troubleshooting
Errors when building the toolchain
If you get the error below, please revert commit:
179c5cb7fd0f06970135187f1203507aa55d6bdein the poky repository (sources/poky). See also Bug 13338 https://bugzilla.yoctoproject.org/show_bug.cgi?id=13338.
ERROR: bytesatwork-minimal-image-1.0-r0 do_populate_sdk: Unable to install packages. Command '/home/daniel/workspace/bytesatwork/yocto/ti-m2-zeus/build/tmp/work/bytepanel_emmc-poky-linux-gnueabi/bytesatwork-minimal-image/1.0-r0/recipe-sysroot-native/usr/bin/apt-get install --force-yes --allow-unauthenticated openssh-ssh openssh-sshd apt dpkg coreutils base-passwd dhcp-client target-sdk-provides-dummy shadow openssh-scp packagegroup-core-standalone-sdk-target packagegroup-core-boot vim openssh-sftp-server run-postinsts' returned 100:
Reading package lists...
Building dependency tree...
Reading state information...
Some packages could not be installed. This may mean that you have
requested an impossible situation or if you are using the unstable
distribution that some required packages have not yet been created
or been moved out of Incoming.
The following information may help to resolve the situation:
The following packages have unmet dependencies:
target-sdk-provides-dummy : Conflicts: coreutils
E: Unable to correct problems, you have held broken packages.
Kernel
Download the Linux Kernel
| Device | Branch | git URL |
|---|---|---|
| byteDEVKIT | baw-v4.19-stm32mp | https://github.com/bytesatwork/linux-stm32mp.git |
| bytePANEL | baw-ti-linux-4.19.y | https://github.com/bytesatwork/ti-linux-kernel.git |
Build the Linux Kernel
For both targets, an ARM toolchain is necessary. You can use the provided toolchain from Where do you get the toolchain? or any compatible toolchain (e.g. from your distribution)
Important
- The following tools need to be installed on your development system:
gitmakebc
Note
The following instructions assume, you installed the provided toolchain for the respective target.
byteDEVKIT
Important
- The following tools need to be installed on your development system:
- OpenSSL headers (Debian package:
libssl-dev) depmod(Debian package:kmod)
- OpenSSL headers (Debian package:
Download kernel sources
Download the appropriate kernel from Download the Linux Kernel.
Source toolchain
source /opt/poky-bytesatwork/3.0.2/environment-setup-cortexa7t2hf-neon-vfpv4-poky-linux-gnueabi
Create defconfig
make multi_v7_defconfig scripts/kconfig/merge_config.sh -m -r .config arch/arm/configs/fragment-* make olddefconfig
Build Linux kernel
make LOADADDR=0xC2000040 -j `nproc` uImage stm32mp157c-bytedevkit-v1-1.dtb modules
Install kernel and device tree
To use the newly created kernel, device tree and/or module, the necessary files need to be installed on the target. This can be done either via Ethernet (e.g.
scp) or by copying the files to the SD card.Note
For scp installation: Don’t forget to mount /boot on the target.
File Target path Target partition arch/arm/boot/uImage/boot/uImage/dev/mmcblk0p4arch/arm/boot/dts/stm32mp157c-bytedevkit-v1-1.dtb/boot/stm32mp157c-bytedevkit.dtb/dev/mmcblk0p4Note
After installing a new kernel, it often fails to load modules, as the _signature_ of the kernel changed and it fails to find its corresponding modules folder. This issue can often be resolved with a symlink:
ln -s /lib/modules/<EXISTING FOLDER> /lib/modules/`uname -r`
Otherwise, please follow the instructions to copy the kernel modules
Install kernel modules
To copy all available modules to the target, it’s best to deploy them locally first and then copy all modules to the target.
mkdir /tmp/bytedevkit make INSTALL_MOD_PATH=/tmp/bytedevkit modules_install
Now you can copy the content of the folder/tmp/bytedevkitinto the target’s root folder (/) which is partition/dev/mmcblk0p5.
bytePANEL
Important
- The following tools need to be installed on your development system:
u-boot-tools
Download kernel sources
Download the appropriate kernel from Download the Linux Kernel.
Source toolchain
source /opt/poky-bytesatwork/3.0.2/environment-setup-armv7at2hf-neon-poky-linux-gnueabi
Create defconfig
make bytepanel_defconfig
Build Linux kernel
make LOADADDR=0x80008000 -j `nproc` uImage bytepanel.dtb
Install kernel and device tree
To use the newly created kernel and device tree, the necessary files need to be installed on the target. This can be done either via Ethernet (e.g.
scp) or in copying the files to the SD card.Note
For scp installation: Don’t forget to mount /boot on the target.
File Target path Target partition arch/arm/boot/uImage/boot/uImage/dev/mmcblk0p1arch/arm/boot/dts/bytepanel.dtb/boot/devtree.dtb/dev/mmcblk0p1
Hardware Development
We provide the development for a wide range of embedded systems, from small-scale embedded components to sophisticated embedded systems with increased security requirements. Our engineers are certified hardware experts and provide long experience in business.
byteENGINE AM335x
General Information: The byteENGINE AM335x is a high performance industrial oriented computing module. It allows a short time-to-market, while reducing development costs and substantial design risks. The system on module (SOM) uses the Texas Instruments AM335x industrial applications processor family. The AM335x features a PowerVRTM SGX Graphics Accelerator Subsystem for 3D graphics acceleration. The Programmable Real-Time Unit and Industrial Communication Subsystem (PRU-ICSS) allows independent operation from the ARM processor. PRU-ICSS enables real-time protocols such as EtherCAT, PROFINET, EtherNet/IP, PROFIBUS, Ethernet Powerlink and Sercos.
The byteENGINE AM335x is a high performance industrial oriented computing module. It allows a short time-to-market, while reducing development costs and substantial design risks.
The system on module (SOM) uses the Texas Instruments AM335x industrial applications processor family. The AM335x features a PowerVRTM SGX Graphics Accelerator Subsystem for 3D graphics acceleration. The Programmable Real-Time Unit and Industrial Communication Subsystem (PRU-ICSS) allows independent operation from the ARM processor. PRU-ICSS enables real-time protocols such as EtherCAT, PROFINET, EtherNet/IP, PROFIBUS, Ethernet Powerlink and Sercos.
Datasheet AM335x: https://www.bytesatwork.io/wp-content/uploads/2019/03/Datasheet_byteENGINE_AM335x-12.pdf
Prepared Pinmux file AM335x: https://download.bytesatwork.io/documentation/byteENGINE/ressources/byteEngineM2-20160922.pinmux
Detailed pinout AM335x: https://download.bytesatwork.io/documentation/byteENGINE/ressources/PinmuxConfigSummary_byteEngineM2-20160922.xlsx
Datasheet Connectors Neltron 2001S-100G-270-020: https://download.bytesatwork.io/documentation/byteENGINE/ressources/Neltron_2000P.pdf
Schematic of the connectors X1 and X2: https://download.bytesatwork.io/documentation/byteENGINE/ressources/m2-connector.pdf
Texas Instruments Sitara™ AM335x Processors: http://www.ti.com/processors/sitara-arm/am335x-cortex-a8/overview.html
AM335x Technical Reference Manual: https://www.ti.com/lit/ug/spruh73q/spruh73q.pdf
TPS65910x Integrated Power-Management Unit: http://www.ti.com/lit/ds/symlink/tps65910.pdf
byteENGINE STM32MP1x
General Information: The byteENGINE STM32MP1x is a high performance industrial oriented computing module. It allows you a short time-to-market, reducing development costs and substantial design risks.
The system on module (SOM) uses the STM32MP15xxAC devices which are based on the high-performance dual-core ARM® Cortex®-A7 32-bit RISC core operating at up to 650 MHz/800 MHz. The STM32MP15xxAC devices also embed a Cortex®-M4 32-bit RISC core operating at up to 200 MHz frequency. The Cortex®-M4 core features a floating point unit (FPU) single precision which supports ARM® single-precision dataprocessing instructions and data types.
Furthermore, the STM32MP15xxAC devices embed a 3D graphic processing unit (Vivante® - OpenGL® ES 2.0) running at up to 533 MHz, with performances up to 26 Mtriangle/s, 133 Mpixel/s.
Factsheet STM32MP1x: https://www.bytesatwork.io/wp-content/uploads/2019/04/Fact-Sheet-byteENGINE_STM32MP1x.pdf
Datasheet STM32MP1x: https://www.bytesatwork.io/wp-content/uploads/2019/12/Datasheet_byteENGINE_STM32MP1x-6.pdf
Detailed pinout STM32MP1x: https://download.bytesatwork.io/documentation/byteENGINE/ressources/byteENGINE-M5-pinout.xlsx
Datasheet Connectors Neltron 2001S-100G-270-020: https://download.bytesatwork.io/documentation/byteENGINE/ressources/Neltron_2000P.pdf
Schematic of the connectors X1 and X2: https://download.bytesatwork.io/documentation/byteENGINE/ressources/m5-connector-pinout.pdf
STMicroelectronics STM32MP1: https://www.st.com/en/microcontrollers-microprocessors/stm32mp1-series.html
STPMIC1 power management IC: https://www.st.com/en/power-management/stpmic1.html
Datasheet STM32MP157C: https://www.st.com/resource/en/datasheet/stm32mp157c.pdf
STM32CubeMX Software Download: https://www.st.com/en/development-tools/stm32cubemx.html
STM32MP1x prepared CubeMX Project: https://download.bytesatwork.io/documentation/byteENGINE/ressources/byteENGINE_STM32MP1.ioc
Prepared project: step model STM32MP1x: https://download.bytesatwork.io/documentation/byteENGINE/ressources/byteengine-m5.step
Altium Library Neltron 2001S-100G-270-020: https://download.bytesatwork.io/documentation/byteENGINE/ressources/2001s-100G-270-020.zip
Altium Library byteENGINE STM32MP1x (X1/X2 position mask on layer 21): https://download.bytesatwork.io/documentation/byteENGINE/ressources/Footprint-byteENGINE-M5.zip