byteDEVKIT (Yocto 2.7)
Image
Where do you get the SD card image?
Device |
Yocto Version |
Download |
Checksum (SHA256) |
|---|---|---|---|
byteDEVKIT |
Yocto 2.7 |
flashlayout_bytesatwork-minimal-image_FlashLayout_sdcard_stm32mp157c-bytedevkit.raw.gz |
7e62644473c21d200603b52d0080894a0ccfd950dd4a2f3c7df2b14753566de8 |
Hint
Updating from an older image?
You can update your older image by using: apt-get update and apt-get upgrade.
check for new version in the table above
edit
/etc/apt/sources.listand point to the new package feedrun
apt-get update; apt-get upgrade
As the yocto framework is based on several packages from various projects or suppliers, it is not guaranteed that
an incremental upgrade by apt-get upgrade works automatically. Some manual adjustments might be needed.
How do you flash the image?
Attention
You need a microSD card with at least 8GB capacity.
All existing data on the microSD card will be lost.
Do not format the microSD card before flashing.
Windows
Unzip the file
flashlayout_bytesatwork-minimal-image_FlashLayout_sdcard_stm32mp157c-bytedevkit.raw.gz(e.g. with 7-zip)Write the resulting file to the microSD card with a tool like Roadkils Disk Image
Linux
gunzip -c flashlayout_bytesatwork-minimal-image_FlashLayout_sdcard_stm32mp157c-bytedevkit.raw.gz | dd of=/dev/mmcblk<X> bs=8M conv=fdatasync status=progress
How do you build an image?
Use repo to download all necessary repositories:
$ mkdir -p ~/workdir/bytedevkit/2.7; cd ~/workdir/bytedevkit/2.7
$ repo init -u https://github.com/bytesatwork/bsp-platform-st.git -b warrior
$ repo sync
If those commands are completed successfully, the following command will set up a Yocto Project environment for byteDEVKIT:
$ cd ~/workdir/bytedevkit/2.7
$ MACHINE=bytedevkit DISTRO=poky-bytesatwork EULA=1 . setup-environment build
The final command builds the development image:
$ cd $BUILDDIR
$ bitbake devbase-image-bytesatwork
The output is found in:
~/workdir/bytedevkit/2.7/build/tmp/deploy/images/bytedevkit
How to modify the image
The image recipes can be found in
~/workdir/<machine name>/<yocto version>/sources/meta-bytesatwork/recipes-core/imagesThis is relative to where you started the
repocommand to fetch all the sources.Edit the minimal-image recipe
bytesatwork-minimal-image.bbAdd the desired software-package to
IMAGE_INSTALLvariable, for example addnet-toolstobytesatwork-minimal-image.bbRebuild the image by:
$ cd ~/workdir/<machine name>/<yocto version>
$ MACHINE=<machine name> DISTRO=poky-bytesatwork EULA=1 . setup-environment build
$ bitbake bytesatwork-minimal-image
How to rename the image
If you want to rename or copy an image, simply rename or copy the image recipe by:
$ cd ~/workdir/<machine name>/<yocto version>/build/tmp/deploy/images/<machine name>
$ cp bytesatwork-minimal-image.bb customer-example-image.bb
Troubleshooting
Image size is too small
If you encounter that your image size is too small to install additional software, please have a look at the
IMAGE_ROOTFS_SIZEvariable under~/workdir/<machine-name>/<yocto version>/sources/meta-bytesatwork/recipes-core/images/bytesatwork-minimal-image.bb. Increase the size if necessary.
Toolchain
Where do you get the toolchain?
Device |
Yocto Version |
Download |
Checksum (SHA256) |
|---|---|---|---|
byteDEVKIT |
Yocto 2.7 |
61896873ac7c75ac711a0b8e439ded6721d1a794deec26b4903178efbf51d307 |
How do you install the toolchain?
Simply download the toolchain and execute the downloaded file, which is a self-extracting shell script.
Hint
If you encounter problems when trying to install the toolchain, make sure the downloaded toolchain is executable. Run chmod +x /<path>/<toolchain-file>.sh to make it executable.
Important
- The following tools need to be installed on your development system:
xz(Debian package:xz-utils)python(any version)gcc
How do you use the toolchain?
Source the installed toolchain:
source /opt/poky-bytesatwork/3.0.3/environment-setup-cortexa7t2hf-neon-vfpv4-poky-linux-gnueabi
Check if Cross-compiler is available in environment:
echo $CC
You should see the following output:
arm-poky-linux-gnueabi-gcc -mthumb -mfpu=neon-vfpv4 -mfloat-abi=hard -mcpu=cortex-a7 -fstack-protector-strong -D_FORTIFY_SOURCE=2 -Wformat -Wformat-security -Werror=format-security --sysroot=/opt/poky-bytesatwork/3.0.3/sysroots/cortexa7t2hf-neon-vfpv4-poky-linux-gnueabi
Crosscompile the source code, e.g. by:
$CC helloworld.c -o helloworld
Check generated binary:
file helloworld
The output that is shown in prompt afterwards:
helloworld: ELF 32-bit LSB pie executable, ARM, EABI5 version 1
How to bring your binary to the target?
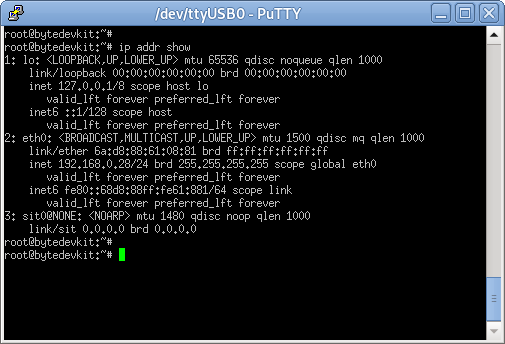
Connect the embedded device’s ethernet to your LAN
Determine the embedded target IP address by
ip addr show
Copy your binary, e.g.
helloworldto the target byscp helloworld root@<ip address of target>:/tmp

Run
chmod +xon the target to make your binary executable:chmod +x /<path>/<binary name>Run your binary on the target:
/<path>/<binary name>
How do you build a toolchain?
$ cd ~/workdir/bytedevkit/2.7
$ repo init -u https://github.com/bytesatwork/bsp-platform-st.git -b warrior
$ repo sync
If those commands are completed successfully, the following command will set up a Yocto Project environment for byteDEVKIT:
$ ~/workdir/bytedevkit/2.7
$ MACHINE=bytedevkit DISTRO=poky-bytesatwork EULA=1 . setup-environment build
The final command builds an installable toolchain:
$ cd $BUILDDIR
$ bitbake devbase-image-bytesatwork -c populate_sdk
The toolchain is located under:
~/workdir/bytedevkit/2.7/build/tmp/deploy/sdk
How to modify your toolchain
Currently the bytesatwork toolchain is generated out of the bytesatwork-minimal-image recipe. If you want to add additional libraries and development headers to customize the toolchain, you need to modify the bytesatwork-minimal-image recipe. It can be found under ~/workdir/<machine name>/<yocto version>/sources/meta-bytesatwork/recipes-core/images
For example if you want to develop your own ftp client and you need libftp and the corresponding header files, edit the recipe bytesatwork-minimal-image.bb and add ftplib to the IMAGE_INSTALL variable.
This will provide the ftplib libraries and development headers in the toolchain. After adding additional software components, the toolchain needs to be rebuilt by:
$ cd ~/workdir/<machine name>/<yocto version>
$ MACHINE=<machine> DISTRO=poky-bytesatwork EULA=1 . setup-environment build
$ bitbake bytesatwork-minimal-image -c populate_sdk
The newly generated toolchain will be available under:
~/workdir/<machine name>/<yocto version>/build/tmp/deploy/sdk
For additional information, please visit: https://www.yoctoproject.org/docs/2.7.2/overview-manual/overview-manual.html#cross-development-toolchain-generation
Kernel
Download the Linux Kernel
Device |
Branch |
git URL |
|---|---|---|
byteDEVKIT |
baw-v4.19-stm32mp |
Build the Linux Kernel
For both targets, an ARM toolchain is necessary. You can use the provided toolchain from Where do you get the toolchain? or any compatible toolchain (e.g. from your distribution)
Important
- The following tools need to be installed on your development system:
gitmakebc
Note
The following instructions assume, you installed the provided toolchain for the respective target.
Important
- The following tools need to be installed on your development system:
OpenSSL headers (Debian package:
libssl-dev)depmod(Debian package:kmod)
Download kernel sources
Download the appropriate kernel from Download the Linux Kernel.
Source toolchain
source /opt/poky-bytesatwork/3.0.3/environment-setup-cortexa7t2hf-neon-vfpv4-poky-linux-gnueabi
Create defconfig
make multi_v7_defconfig
scripts/kconfig/merge_config.sh -m -r .config arch/arm/configs/fragment-*
make olddefconfig
Build Linux kernel
make LOADADDR=0xC2000040 -j `nproc` uImage stm32mp157c-bytedevkit-v1-1.dtb modules
Install kernel and device tree
To use the newly created kernel, device tree and/or module, the necessary files need to be installed on the target. This can be done either via Ethernet (e.g.
scp) or by copying the files to the SD card.Note
For scp installation: Don’t forget to mount /boot on the target.
File
Target path
Target partition
arch/arm/boot/uImage/boot/uImage/dev/mmcblk0p4arch/arm/boot/dts/stm32mp157c-bytedevkit-v1-1.dtb/boot/stm32mp157c-bytedevkit.dtb/dev/mmcblk0p4Note
After installing a new kernel, it often fails to load modules, as the _signature_ of the kernel changed and it fails to find its corresponding modules folder. This issue can often be resolved with a symlink:
ln -s /lib/modules/<EXISTING FOLDER> /lib/modules/`uname -r`
Otherwise, please follow the instructions to copy the kernel modules
Install kernel modules
To copy all available modules to the target, it’s best to deploy them locally first and then copy all modules to the target.
mkdir /tmp/bytedevkit
make INSTALL_MOD_PATH=/tmp/bytedevkit modules_install
Now you can copy the content of the folder
/tmp/bytedevkitinto the target’s root folder (/) which is partition/dev/mmcblk0p5.
